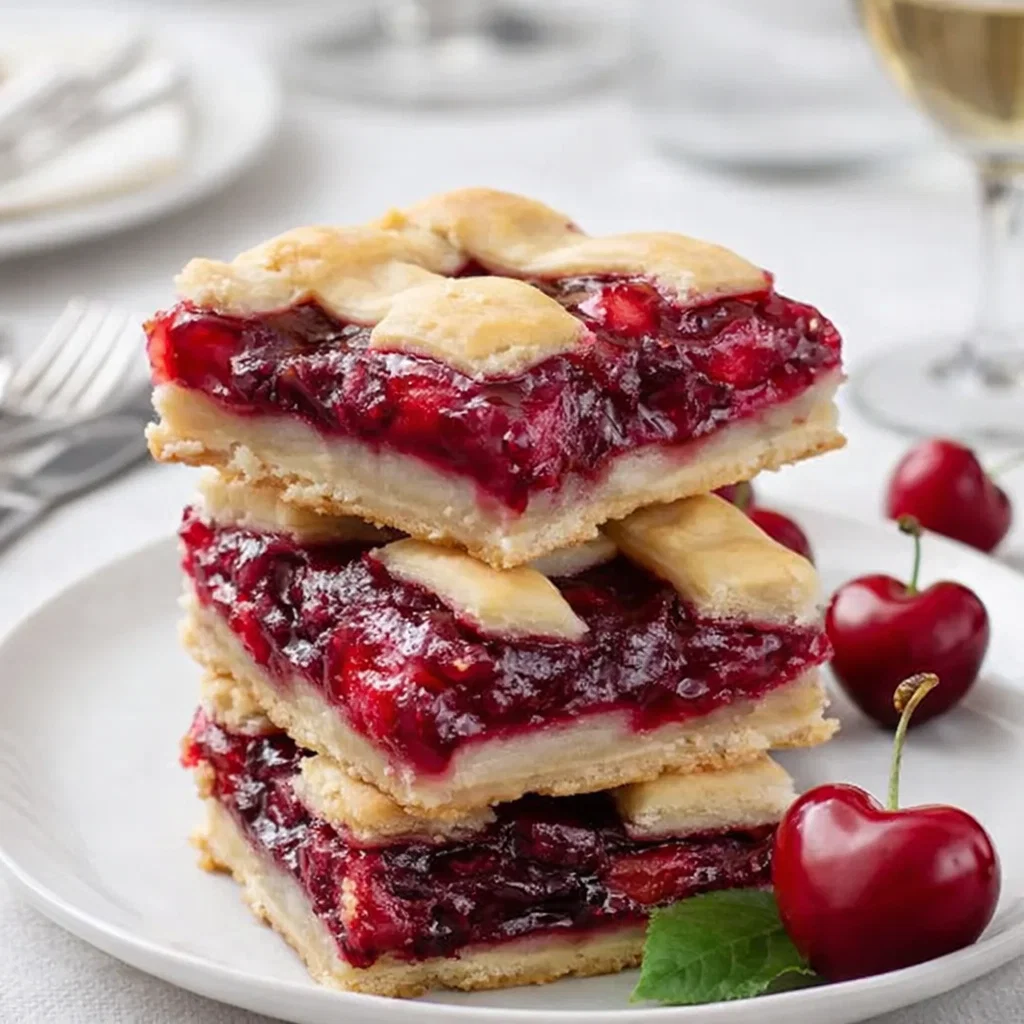
Easy Cherry Pie Bars are the ultimate sanity-saver for anyone who loves the taste of a classic pie but lacks the patience to deal with a finicky crust. We have all been there, hovering over a kitchen counter with flour in our hair, trying to get a dough to cooperate while the kids ask for the tenth time when dessert will be ready. This Easy Cherry Pie Bars recipe takes all that stress and tosses it right out the window. Because these bars use a simple buttery dough that doubles as both the base and the topping, you get that comforting, jammy goodness without the lattice-work headache. In the middle of a hectic week, having a reliable dessert like Easy Cherry Pie Bars in your back pocket feels like a genuine win. They are sweet, slightly tart, and have that secret hint of almond that makes everyone think you spent hours in a professional bakery. Since life moves fast, we need treats that can keep up without sacrificing that homemade soul we all love.
What is Easy Cherry Pie Bars?
If you took a traditional cherry pie and reimagined it as a portable, shareable finger food, you would get these incredible bars. They consist of a soft, shortbread-like crust that perfectly cradles a thick layer of premium cherry filling. Unlike a deep-dish pie that often requires a fork and a prayer to keep it from falling apart, these bars hold their shape beautifully. They represent the perfect marriage between a cookie and a pastry. Many busy moms love this version because it feeds a crowd easily using a standard baking pan. While a traditional pie serves maybe eight people if you’re lucky, a batch of Easy Cherry Pie Bars can easily be sliced into twenty-four generous squares. This makes them the MVP of any school bake sale or neighborhood potluck. You essentially get the elegance of a tart with the convenience of a brownie, which is a total win in any kitchen.
Reasons to Try Easy Cherry Pie Bars
First and foremost, you should try these because they are practically foolproof. If you can stir a bowl and turn on an oven, you are overqualified for this job. Another reason to love them is the incredible texture; the crust is buttery and rich, providing the perfect contrast to the fruity center. Since we use almond extract, the flavor profile is elevated far beyond your average canned filling. It creates a sophisticated taste that pairs wonderfully with a cup of coffee or a cold glass of milk. Furthermore, these bars are incredibly versatile. While we are focusing on cherries today, you could easily swap the filling for blueberry or apple in the future. They also travel well, so you won’t have to worry about a messy catastrophe in the backseat of your car on the way to a party. Honestly, the smell alone wafting through your house is reason enough to get baking right now.
Ingredients Needed to Make Easy Cherry Pie Bars
- 1 cup softened butter: Real butter provides that rich, bakery-style flavor.
- 1 cup sugar: Standard granulated sugar creates the perfect level of sweetness.
- 2 large eggs: Use room-temperature eggs to keep the batter smooth and creamy.
- 1 tsp almond extract: This little bottle holds the secret to that “professional” cherry taste.
- 1 tsp vanilla extract: A must-have aromatic that rounds out the buttery dough.
- 2 ½ cups all-purpose flour: This builds the sturdy, soft structure of your bars.
- ½ tsp salt: A tiny pinch balances the sugar and makes the fruit flavors pop.
- 1 (21 oz) can premium cherry pie filling: Look for “extra fruit” varieties for the best results.
- 1 cup confectioners’ sugar: This creates the snowy, sweet finish for the top.
- Milk: Just a splash or two helps the glaze reach a perfect drizzling consistency.
Instructions to Make Easy Cherry Pie Bars – Step by Step
Step 1 Start your Step by Step journey by preheating your oven to 350°F (175°C). While the oven warms up, grab your 15x10x1-inch baking pan and grease it thoroughly so nothing sticks. In a large mixing bowl, use your electric mixer to cream the softened butter and granulated sugar together. You want to beat them until the mixture looks pale and fluffy, which usually takes about three minutes. This Step by Step aeration is the key to a light, melt-in-your-mouth crust that doesn’t feel heavy or greasy.
Step 2 Once your butter and sugar look like clouds, add the eggs one at a time. Beat the mixture well after each egg to keep the emulsion stable and smooth. Now, pour in the almond and vanilla extracts. Following this Step by Step method ensures the flavor distributes evenly throughout the entire batch. You will notice the kitchen starts smelling like a fancy French patisserie almost immediately, which is honestly the best part of the whole process.
Step 3 Now it is time to bring in the dry ingredients. Gradually add the all-purpose flour and salt to your wet base. Set your mixer to a low speed or switch to a sturdy spatula to combine them. In this Step by Step phase, you only want to mix until the white streaks of flour disappear. If you keep mixing too long, you might end up with a tough crust. The dough should feel thick, soft, and just a little bit tacky to the touch.
Step 4 Take about two-thirds of your buttery dough and drop it in small clumps across the bottom of your prepared pan. Use your fingers or a flat-bottomed glass to press it into an even layer. This Step by Step foundation will support all that juicy fruit. Next, open your can of premium cherry pie filling and spread it carefully over the dough. Try to get those cherries all the way to the corners so every single bite is packed with tart, fruity goodness.
Step 5 With the remaining one-third of the dough, use a teaspoon to drop little dollops over the top of the cherry layer. You do not need to cover the fruit completely; a “cobbler” style look with bits of red peeking through is exactly what we want. Slide the pan into the oven and bake for 35 to 40 minutes. This Step by Step baking time allows the bottom crust to set while the top becomes a beautiful golden brown.
Step 6 While the bars cool on the counter, whisk together the confectioners’ sugar, extra extracts, and a few drops of milk. Once the pan feels cool to the touch, use a spoon to drizzle the glaze in a fun zig-zag pattern over the bars. This final Step by Step flourish makes the dessert look incredibly professional. Let the glaze set for a few minutes before slicing them into twenty-four squares and serving them to your hungry family.
What to Serve with Easy Cherry Pie Bars
These bars are a total powerhouse on their own, but if you want to go the extra mile, a scoop of vanilla bean ice cream is the ultimate companion. The cold creaminess melting into the jammy cherry filling feels like a hug in a bowl. If you are hosting a morning brunch, these bars sit perfectly next to a savory breakfast casserole or a fresh fruit platter. For a lighter afternoon snack, a dollop of freshly whipped cream with a tiny pinch of lemon zest can brighten up the flavors beautifully. You might even find that they pair exceptionally well with a sharp coffee or hot tea for a cozy afternoon pick-me-up.
Key Tips for Making Easy Cherry Pie Bars
To get the best results, always opt for the premium version of pie filling. These usually have a higher fruit-to-syrup ratio, which keeps your bars from becoming soggy. If the dough feels too sticky to handle, try chilling it in the fridge for ten minutes or lightly flouring your hands before pressing it into the pan. Another pro tip involves the cooling process. I know the smell is tempting, but you must let the bars cool completely before you slice them. If you cut them while they are still warm, the cherry filling will likely run everywhere. For those perfect, clean squares you see in magazines, use a sharp knife and wipe it clean with a damp paper towel between every single cut.
Storage and Reheating Tips Easy Cherry Pie Bars
If you somehow end up with leftovers, these bars store incredibly well in an airtight container. You can leave them on the counter at room temperature for about two days, or keep them in the fridge for up to a week. Chilling them actually makes the crust a bit firmer, which some people think tastes even better. If you want that just baked warmth, simply pop a bar in the microwave for ten seconds. You can also freeze these bars for up to three months! Just wrap them tightly in plastic wrap and store them in a freezer bag. When the craving hits, let a square thaw on the counter for an hour, and it will be ready to enjoy.
FAQs
Can I use a different fruit filling for this recipe? Yes, you absolutely can! This buttery dough works perfectly with blueberry, apple, or even peach pie filling. Just follow the same measurements and baking times. Do I have to use the almond extract? While the almond extract gives these bars their signature bakery flavor, you can swap it for extra vanilla if you have an allergy or just prefer a more traditional cookie taste. How do I know when the bars are done baking? Look for the edges of the crust to pull away slightly from the pan and turn a light golden brown. The dollops on top should also look set and matte rather than shiny.
Final Thoughts
Making a delicious dessert shouldn’t feel like a chore or a high-stakes science experiment. These Easy Cherry Pie Bars prove that you can achieve incredible, crowd-pleasing results with just a few pantry staples and very little active effort. Whether you are baking for a hectic school night or a planned family reunion, this recipe delivers consistent joy every single time. It is a relatable, down-to-earth treat that reminds us why we love baking—to share something sweet with the people we love. So grab your mixer, put on your favorite playlist, and treat yourself to a batch of these fruity, buttery delights today. You have definitely earned a break, and a plate of Easy Cherry Pie Bars is the perfect way to enjoy one.
Print
- Prep Time: 15 minutes
- Cook Time: 35 minutes
- Total Time: 50 minutes
- Yield: About 24 bars 1x
- Category: Dessert
- Method: Baking
- Cuisine: American
- Diet: Vegetarian
Description
Easy cherry pie bars with a buttery crust, sweet-tart cherry filling, and a hint of almond flavor, finished with a simple glaze.
Ingredients
- 1 cup softened butter
- 1 cup sugar
- 2 large eggs, room temperature
- 1 teaspoon almond extract
- 1 teaspoon vanilla extract
- 2 1/2 cups all-purpose flour
- 1/2 teaspoon salt
- 1 (21 oz) can cherry pie filling
- 1 cup confectioners’ sugar (for glaze)
- 1 teaspoon almond extract (for glaze)
- 1/2 teaspoon vanilla extract (for glaze)
- Milk as needed (for glaze)
Instructions
1. Preheat oven to 350°F (175°C).
2. Cream together butter and sugar until light and fluffy.
3. Add eggs, almond extract, and vanilla extract, mixing well.
4. Stir in flour and salt until a soft dough forms.
5. Press half of the dough evenly into a greased 15x10x1-inch baking pan.
6. Spread cherry pie filling evenly over the crust.
7. Drop spoonfuls of the remaining dough over the filling.
8. Bake for 35–40 minutes or until lightly golden.
9. Allow to cool completely in the pan.
10. Mix glaze ingredients with enough milk to reach a drizzle consistency, then drizzle over bars before serving.
Notes
Use high-quality cherry pie filling for the best flavor.
Allow bars to cool fully before glazing to prevent melting.
For cleaner cuts, chill the bars slightly before slicing.
These bars are great for potlucks, parties, or holiday desserts.
A touch of almond extract enhances the cherry flavor beautifully.
Nutrition
- Serving Size: 1 bar
- Calories: 180
- Sugar: 14g
- Sodium: 120mg
- Fat: 8g
- Saturated Fat: 5g
- Unsaturated Fat: 3g
- Trans Fat: 0g
- Carbohydrates: 25g
- Fiber: 1g
- Protein: 2g
- Cholesterol: 35mg