Sheet pan chicken fajita crunchwrap is the absolute hero of weeknight dinners, combining everything we love about zesty Mexican flavors with the convenience of a one-pan wonder. If you are a busy mom or a professional trying to juggle a million things at once, you know the struggle of getting a meal on the table that everyone—even the picky eaters—will actually cheer for. I have been there, staring at the fridge after a long day in San Francisco, wishing for a dinner that feels like a treat but doesn’t leave me with a mountain of dishes. This sheet pan chicken fajita crunchwrap is the answer to those “what’s for dinner” prayers, delivering a crispy, cheesy, and totally satisfying experience that serves the whole family at once.
What is Sheet Pan Chicken Fajita Crunchwrap?
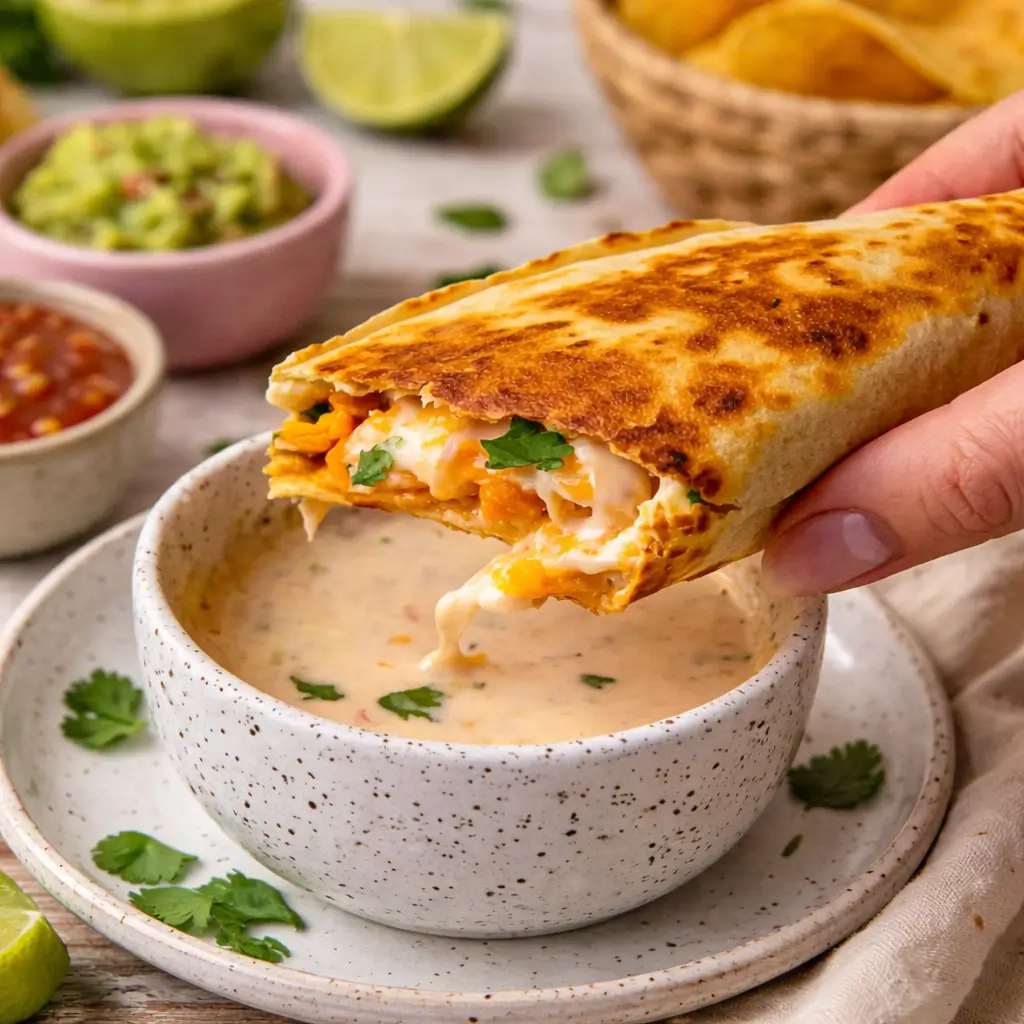
A sheet pan chicken fajita crunchwrap is a brilliant, oversized version of the famous handheld classic, designed to be baked all at once on a single baking sheet. Imagine tender, taco-seasoned chicken strips and vibrant bell peppers nestled between layers of gooey melted cheddar and crunchy nacho cheese tortilla chips. Instead of folding individual wraps for twenty minutes, you tuck everything into a clever arrangement of large flour tortillas that cover an entire pan. It is basically a giant, crispy fajita sandwich that you can slice up like a pizza, making it perfect for feeding a hungry crowd without the usual kitchen chaos.
Reasons to Try Sheet Pan Chicken Fajita Crunchwrap
There are so many reasons to fall in love with this recipe, starting with the fact that it is a total time-saver for anyone with a packed schedule. Since we roast the chicken and veggies together on one pan, you aren’t stuck standing over a hot stove sautéing individual batches. This recipe is also a fantastic way to sneak in plenty of colorful bell peppers, which provide a boost of vitamins for the kids while they are distracted by the “crunch” of the chips. Plus, it is incredibly versatile; you can easily swap ingredients to suit what you have in the pantry or to accommodate different dietary needs. Most importantly, the communal style of slicing and serving right from the pan makes dinner feel like a fun, shared event rather than just another chore.
Ingredients Needed to Make Sheet Pan Chicken Fajita Crunchwrap
To get this deliciousness on your table, you will need a few simple, fresh ingredients that are probably already on your grocery list:
- Chicken Breasts: 3 pieces, sliced into thin, even strips for quick roasting.
- Onions: 2 medium onions, sliced to add that classic fajita sweetness.
- Bell Peppers: 4 pieces (a mix of yellow, red, green, and orange makes it look beautiful!).
- Taco Seasoning: 2 tablespoons for the chicken and an extra 1–2 tablespoons for the dip.
- Olive Oil: 4 tablespoons to ensure everything roasts to perfection.
- Large Flour Tortillas: 9 tortillas in total to create the “shell.”
- Salted Butter: 1 tablespoon, melted, to help the outside get golden and crispy.
- Cheddar Cheese: 3 cups, grated (because you can never have too much cheese!).
- Nacho Cheese Tortilla Chips: 3 cups to provide that signature crunch.
- Sour Cream & Mayonnaise: 1 cup of sour cream and 1/2 cup of mayo for the zesty dip.
- Green Chilies: 2 tablespoons, drained, to add a little kick to your sauce.
- Honey & Lime Juice: 1 tablespoon of each to balance the flavors with sweetness and tang.
- Garlic Powder & Salt: 1/2 teaspoon each for that extra savory punch.
Instructions to Make Sheet Pan Chicken Fajita Crunchwrap – Step by Step
Getting this recipe right is all about the assembly, so let’s walk through the process Step by Step to ensure your crunchwrap is a total success.
Step 1 Start by preheating your oven to 400°F (200°C) so it is nice and hot the moment your prep is done. While the oven warms up, slice your chicken breasts, onions, and all those colorful bell peppers into uniform strips. Toss them into a large bowl with the olive oil and 2 tablespoons of taco seasoning, mixing until every piece is perfectly coated in that savory spice.
Step 2 Spread the chicken and vegetable mixture in a single layer across a large baking sheet and roast for about 25 minutes. Once they are tender and slightly charred, pull the pan out and turn the oven temperature down to 350°F (175°C). It is really important to use tongs to transfer the filling later rather than pouring the whole pan out, as this keeps excess liquid away from your tortillas.
Step 3 While your chicken is roasting, you can whip up the zesty homemade dip by whisking together the sour cream, mayonnaise, extra taco seasoning, green chilies, honey, lime juice, garlic, and salt. Pop this in the fridge to let the flavors meld while you finish the main event.
Step 4 Now comes the fun part of the Step by Step assembly! Brush a second large baking sheet with your melted salted butter. Place one flour tortilla right in the center, then arrange six more tortillas around the edges. You want them to overlap in the middle and hang over the sides of the pan so you have plenty of “flaps” to fold over later.
Step 5 Start layering by sprinkling half of your shredded cheddar cheese over the base, followed by half of your roasted chicken and veggie mix. Spread all 3 cups of the nacho cheese tortilla chips in an even layer across the middle—this is what gives us that amazing crunch! Finish the filling by adding the rest of the chicken and the remaining cheese on top.
Step 6 To close your masterpiece, fold the overhanging edges of the tortillas back toward the center. Since there might be a gap in the middle, place your last two tortillas on top to act as a lid, covering all that cheesy goodness completely.
Step 7 To get that perfect restaurant-style finish, cover the wrap with a piece of parchment paper and place another baking sheet on top. If you want it extra sealed, weigh it down with a heavy cast-iron skillet. Slide the whole stack into the 350°F oven and bake for 30 minutes until the exterior is golden and remarkably crispy.
Step 8 Once baked, let it sit for just a minute before slicing it into generous squares. Serve it hot with that chilled zesty dip and any extra garnishes like fresh salsa or guacamole that your family loves. Following these instructions Step by Step ensures you get a perfect seal and a crunch that won’t quit!
What to Serve with Sheet Pan Chicken Fajita Crunchwrap
This meal is basically a one-pan wonder that hits all the right spots, but if you’re looking to round out the plate, you’ve got some delicious options. A crisp garden salad or a zesty bowl of Mexican street corn works like a charm to balance out all that melty, cheesy goodness. If you’re staring down a table of hungry teenagers who seem to have bottomless stomachs, serving this alongside some cilantro lime rice or savory slow-cooked black beans is a total pro move. And let’s be real—half the fun is in the toppings! Set out a big bowl of creamy guacamole, a dollop of sour cream, and some tangy pickled jalapeños so everyone can dress up their slice exactly how they want.
Key Tips for Making Sheet Pan Chicken Fajita Crunchwrap
The secret to a non-soggy crunchwrap is moisture control. As mentioned in the steps, always use tongs to lift the chicken and peppers from the roasting pan so the juices stay behind. If you find your tortillas aren’t staying folded, a little extra melted butter can act like “glue” to hold them in place before you put the second pan on top. Also, don’t be afraid to press down firmly with that cast-iron skillet; the flatter the crunchwrap, the more evenly it will brown and the easier it will be to slice later. If you are worried about the chips getting soft, make sure your chicken has cooled for just a minute or two before layering them in.
Storage and Reheating Tips Sheet Pan Chicken Fajita Crunchwrap
If you happen to have leftovers—though in my house, that’s a rare miracle—you can store the slices in an airtight container in the refrigerator for up to three days. To keep that “crunch” alive when reheating, avoid the microwave at all costs! Instead, pop the slices back into a toaster oven or a regular oven at 350°F for about 10 minutes. This will help the cheese get melty again and crisp up the tortilla shell so it tastes just as good as it did on night one. You can even use an air fryer for a quick 3-5 minute blast to get that perfect texture back in a flash.
FAQs
Can I use beef instead of chicken? Absolutely! You can swap the chicken for thin strips of flank steak or even ground beef. Just adjust your roasting time to ensure the meat is cooked through.
Is there a way to make this vegetarian? Definitely. You can replace the chicken with a mix of black beans, corn, and extra mushrooms or zucchini. Just make sure to sauté or roast the veggies well to remove excess water.
What if I don’t have a second baking sheet to weigh it down? You can use a large piece of aluminum foil and a couple of heavy oven-safe pots or pans to keep the pressure on the tortillas while they bake.
Final Thoughts
Making a sheet pan chicken fajita crunchwrap is truly one of the most rewarding ways to handle a busy weeknight dinner. It takes the stress out of the kitchen while delivering a meal that feels fun, festive, and incredibly delicious. Whether you are hosting a casual game night or just trying to survive a Tuesday, this recipe brings everyone together around the table for a shared experience that is hard to beat. I hope this dish becomes a new favorite in your home, bringing a little extra joy and a lot of extra flavor to your family’s routine. Give it a try tonight—your taste buds (and your dish-scrubbing hands) will thank you!
Print
Sheet Pan Chicken Fajita Crunchwrap: The Ultimate Family Dinner
- Prep Time: 15 minutes
- Cook Time: 1 hour
- Total Time: 1 hour 15 minutes
- Yield: 8 servings 1x
- Category: Main-course
- Method: Baking
- Cuisine: Tex-Mex
- Diet: Halal
Description
A delicious and easy sheet pan chicken fajita crunchwrap perfect for family dinners. Tender roasted chicken, colorful bell peppers, and onions are layered with cheddar cheese and crunchy nacho cheese tortilla chips, all encased in golden flour tortillas and served with a zesty homemade dip.
Ingredients
- Main Crunchwrap
- 3 chicken breasts
- 2 medium onions
- 4 bell peppers (yellow, red, green, orange)
- 2 tablespoons taco seasoning
- 4 tablespoons olive oil
- 9 large flour tortillas
- 1 tablespoon salted butter, melted
- 3 cups cheddar cheese, grated
- 3 cups nacho cheese tortilla chips
- Dip
- 1 cup sour cream
- 1/2 cup mayonnaise
- 1–2 tablespoons taco seasoning
- 2 tablespoons green chilies (drained)
- 1 tablespoon honey
- 1 tablespoon lime juice
- 1/2 teaspoon garlic powder
- 1/2 teaspoon salt
- Optional Garnishes
- Salsa
- Guacamole
- Fresh chopped tomatoes
Instructions
1. Preheat oven to 400°F (200°C).
2. Slice chicken breasts, onions, and bell peppers into strips. Place in a large bowl with taco seasoning and olive oil and mix until evenly coated.
3. Spread the chicken and vegetable mixture evenly onto a large baking sheet and roast for 25 minutes.
4. Reduce oven temperature to 350°F (175°C). Using tongs, transfer the cooked chicken and vegetables to avoid excess liquid.
5. Prepare the dip by mixing sour cream, mayonnaise, taco seasoning, green chilies, honey, lime juice, garlic powder, and salt in a bowl. Refrigerate until ready to serve.
6. Spread melted butter on a large baking sheet. Place one tortilla in the center and arrange six tortillas around the edges overlapping so they hang over the sides.
7. Sprinkle half of the cheddar cheese over the tortillas, then layer half of the chicken and vegetable mixture.
8. Add the nacho cheese tortilla chips, then the remaining chicken mixture, and top with the remaining cheddar cheese.
9. Fold the overhanging tortillas toward the center to enclose the filling and place the remaining tortillas on top to cover exposed areas.
10. Cover with parchment or wax paper and place another pan on top. Weigh it down with a heavy skillet if needed.
11. Bake at 350°F (175°C) for 30 minutes until the tortillas are golden and crispy.
12. Slice and serve hot with the prepared dip, salsa, guacamole, and chopped tomatoes.
Notes
Transfer the chicken and vegetable mixture with tongs instead of pouring to prevent excess liquid from making the crunchwrap soggy.
Place a heavy pan or skillet on top while baking to keep the crunchwrap sealed and crisp.
Customize the filling with additions like corn, black beans, or different cheeses.
Taste and adjust the dip seasoning before serving.
Nutrition
- Serving Size: 1 slice (approx. 1/8 crunchwrap)
- Calories: 560
- Sugar: 6g
- Sodium: 980mg
- Fat: 33g
- Saturated Fat: 13g
- Unsaturated Fat: 16g
- Trans Fat: 0g
- Carbohydrates: 42g
- Fiber: 4g
- Protein: 28g
- Cholesterol: 85mg